20,93€
Op voorraad

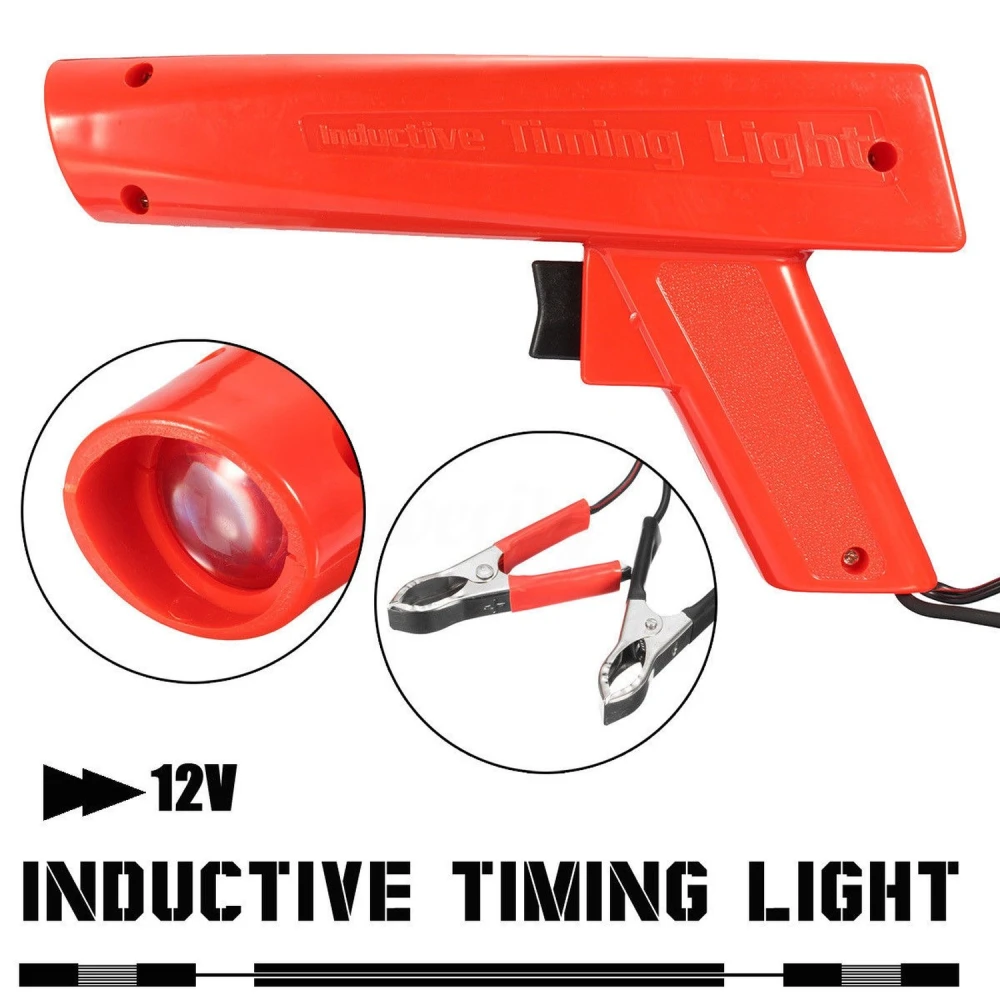
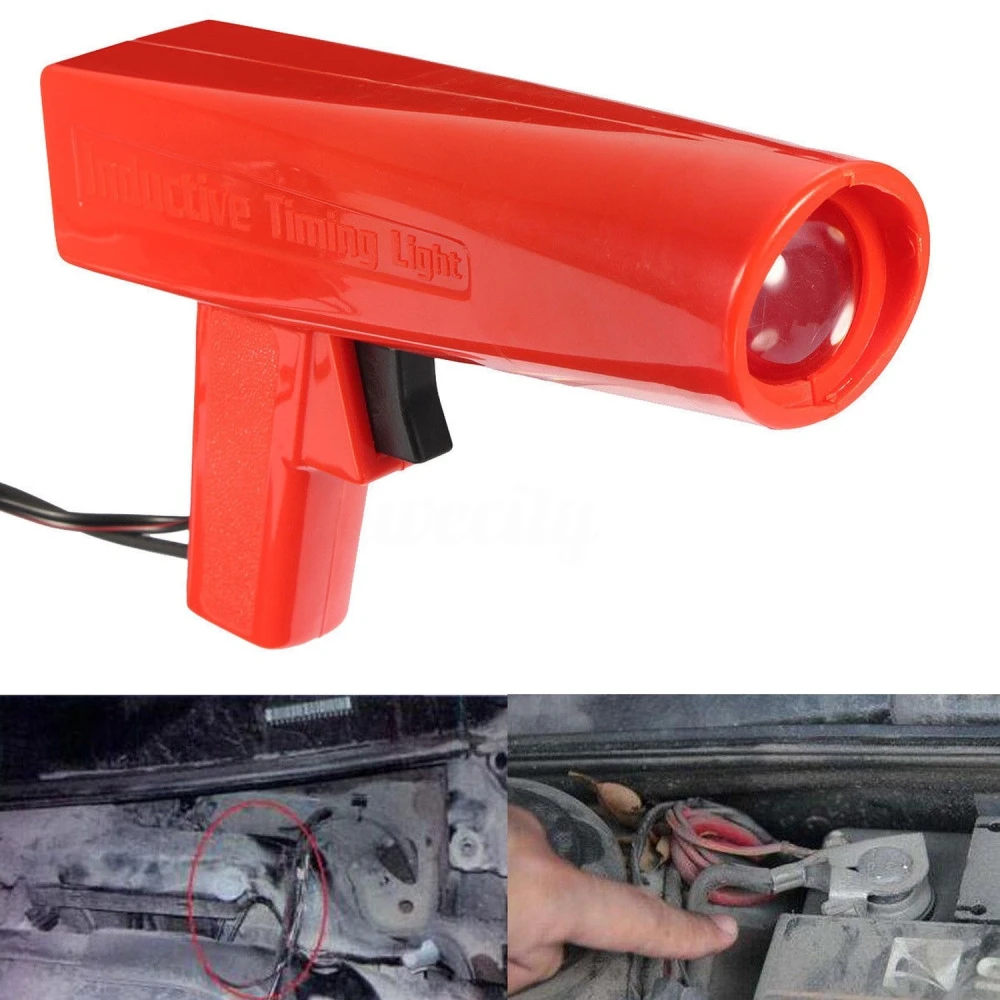

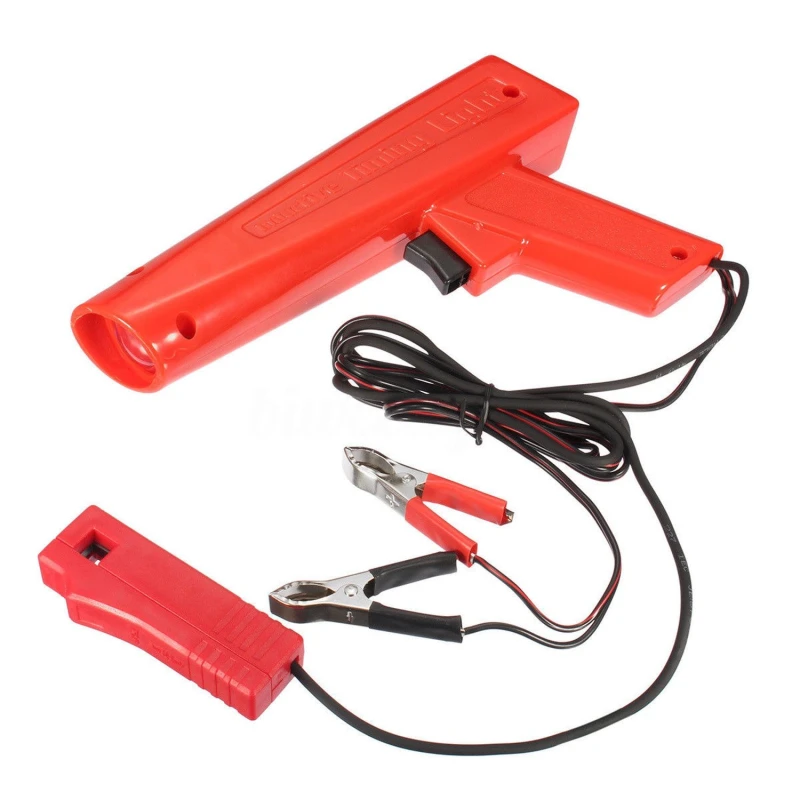
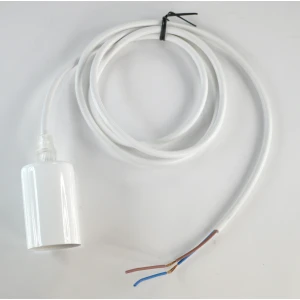
12V stroboscooplamp met xenon voor ontstekingstiming bij benzinemotoren
Merk: TSX TOOL
20,93€
IVA inbegrepen (Excl. btw: 17,30€)
Op voorraad - Direct verzonden
Standaardlevering
Wo, Apr 22 - Vr, Apr 24
Expresslevering
Ma, Apr 20 - Di, Apr 21
30 dagen retour
Gratis retourneren binnen 30 dagen
Beveiligde transactie
Share:
Gratis bezorging
Bij bestellingen boven 300€
Eenvoudig retourneren
30 dagen retourbeleid
Veilig betalen
100% veilig afrekenen
Kwaliteitsgarantie
Alleen originele producten
Algemene beschrijving:
De 12V stroboscooplamp met xenon is een onmisbaar gereedschap voor monteurs en doe-het-zelvers die de ontstekingstiming van benzinemotoren nauwkeurig willen afstellen, zowel in auto’s als motoren. Dankzij de krachtige xenonlamp maakt het apparaat de ontstekingsflitsen zichtbaar en kan de motor correct worden gesynchroniseerd met de referentiemarkeringen op de poelie of het vliegwiel.
Belangrijkste kenmerken:
- Werkt op 12V, compatibel met standaard ontstekingssystemen van benzinevoertuigen.
- Inclusief twee stevige klemmen: een rode voor aansluiting op de plus van de accu en een zwarte voor aansluiting op massa van de motor.
- Inductieve sensor voor aansluiting op de bougiekabel van cilinder nummer 1, voor een nauwkeurige ontstekingsmeting.
- Stroboscooplamp met xenonlamp die helder licht geeft voor het aflezen en afstellen van de ontstekingstiming.
- Stevige behuizing van ABS-materiaal met activeringsschakelaar voor comfortabel en veilig gebruik.
- Vermogen van 3.6W voor een efficiënte en duurzame werking.
Technische specificaties:
- Ingangsspanning: 12V
- Vermogen: 3.6W
- Materiaal: ABS
Typische toepassingen:
Deze stroboscooplamp is perfect voor het afstellen van de ontsteking in benzinemotoren en verbetert de prestaties en efficiëntie van de motor. Geschikt voor reparatiewerkplaatsen, onderhoud van personenauto’s en motoren, evenals voor gebruikers die thuis mechanische afstellingen uitvoeren.
Compatibiliteit:
Compatibel met 12V-ontstekingssystemen in benzinemotoren van auto’s en motoren. Niet geschikt voor dieselmotoren of elektrische systemen anders dan 12V.
Extra voordelen:
- Maakt een snelle en professionele afstelling van de ontstekingstiming mogelijk.
- Ergonomisch en robuust ontwerp dat het gebruik in veeleisende omgevingen vergemakkelijkt.
- Het xenonlicht via speciale lenzen zorgt voor een duidelijk zicht, zelfs bij weinig licht.
Met deze stroboscooplamp wordt het onderhoud en afstellen van de ontsteking van benzinemotoren een eenvoudig, nauwkeurig en betrouwbaar proces.
- Werkt op 12V voor benzinemotoren van auto’s en motoren
- Stroboscooplamp met xenonlamp voor nauwkeurige afstelling van de ontsteking
- Inclusief accuklemmen (plus) en massaklem van de motor (min)
- Inductieve sensor voor aansluiting op de bougiekabel van cilinder nr. 1
- Stevige ABS-behuizing met activeringsschakelaar
- Vermogen van 3.6W voor efficiënte en duurzame prestaties
Klantvragen & Antwoorden
Quines són les funcions principals de la pistola estroboscòpica i quins beneficis aporta davant dels mètodes tradicionals d’ajust d’encesa?
La funció principal de la pistola estroboscòpica és facilitar l’ajust precís del temps d’encesa en motors de gasolina, permetent observar marques de referència a la politja o al volant motor amb llum de xenó sincronitzada amb el pols de la bugia. Això aporta més precisió i rapidesa davant mètodes manuals (com l’ús de làmpades convencionals), reduint errors i millorant el rendiment del motor.
Quins materials componen la pistola i quines són les seves dimensions i pes aproximats?
La pistola està fabricada amb carcassa d’ABS, reconeguda per ser lleugera i resistent a l’ús de taller. Tot i que el fabricant no especifica dimensions exactes, productes similars solen fer entre 200 i 250 mm de longitud i pesar al voltant de 400-600 g, cosa que en facilita el maneig prolongat. El pes pot variar segons els accessoris inclosos.
Quins requisits de compatibilitat té la pistola per a motors i sistemes elèctrics?
Aquesta pistola estroboscòpica és compatible exclusivament amb motors de gasolina equipats amb sistemes d’encesa de 12 V (no apta per a dièsel). Cal disposar d’accés a la bateria de 12 V i de cables de bugia accessibles per a la connexió del sensor inductiu.
Quins són els passos recomanats per a la instal·lació i la posada en marxa segura de la pistola estroboscòpica?
Es recomana primer connectar la pinça vermella al born positiu (+) de la bateria i la negra al negatiu (-) o massa del motor. Posteriorment, es col·loca el sensor inductiu al cable de la bugia del cilindre núm. 1. Un cop fet això, només cal accionar el gallet de la pistola durant el funcionament del motor. És important evitar el contacte amb peces mòbils i assegurar les connexions abans d’usar-la.
Hi ha limitacions d’ús continu, possibles problemes amb connexions o manteniment requerit?
Com que utilitza una làmpada de xenó de 3.6 W, és apta per a sessions d’ajust típiques (minuts). Usos molt prolongats poden sobreescalfar la carcassa o fatigar els cables. Recomano verificar periòdicament la neteja de les pinces i el sensor inductiu, i no exposar l’equip a agents corrosius o humitat. Davant de flaixos irregulars, convé revisar el contacte del sensor i la bateria.
What are the main functions of the timing light and what benefits does it offer over traditional ignition adjustment methods?
The main function of the timing light is to make it easier to set ignition timing accurately on petrol engines, allowing you to observe reference marks on the pulley or flywheel with xenon light synchronised to the spark plug pulse. This provides greater accuracy and speed than manual methods (such as conventional lamps), reducing errors and improving engine performance.
What materials make up the light and what are its approximate dimensions and weight?
The light is made with an ABS housing, known for being lightweight and resistant to workshop use. Although the manufacturer does not specify exact dimensions, similar products usually measure between 200 and 250 mm in length and weigh around 400–600 g, which makes prolonged handling easier. Weight may vary depending on included accessories.
What compatibility requirements does the light have for engines and electrical systems?
This timing light is compatible exclusively with petrol engines fitted with 12 V ignition systems (not suitable for diesel). You need access to the 12 V battery and accessible spark plug leads for connection of the inductive sensor.
What are the recommended steps for installation and safe start-up of the timing light?
It is recommended first to connect the red clip to the positive (+) battery terminal and the black clip to the negative (-) terminal or engine earth. Then place the inductive sensor on the spark plug lead for cylinder no. 1. Once this is done, simply pull the trigger while the engine is running. It is important to avoid contact with moving parts and to secure the connections before use.
Are there any limits on continuous use, possible connection issues or maintenance required?
As it uses a 3.6 W xenon lamp, it is suitable for typical adjustment sessions lasting a few minutes. Very prolonged use may overheat the housing or fatigue the cables. I recommend checking the cleanliness of the clips and inductive sensor periodically, and not exposing the equipment to corrosive agents or moisture. If flashes are irregular, check the sensor contact and the battery.
Schrijf een klantbeoordeling
Klanten die dit artikel kochten, kochten ook


Uw recent bekeken artikelen

20,93€